Before tissues can be studied under the microscope, they must go through a series of preparation steps. This process is called tissue processing or histological preparation.
Tissue processing makes tissues firm, thin, and transparent enough for light to pass through, allowing clear observation of the cells and their structures.
In simple terms, tissue processing turns a fresh tissue sample into a permanent slide that can be examined for years.
2. Purpose of Tissue Processing
To preserve the tissue in as natural a state as possible.
To make the tissue firm so that it can be cut into thin sections.
To allow stains to penetrate the cells and highlight structures.
To prevent decay or decomposition of the tissue.
3. Main Stages of Tissue Processing
The steps usually occur in the following order:
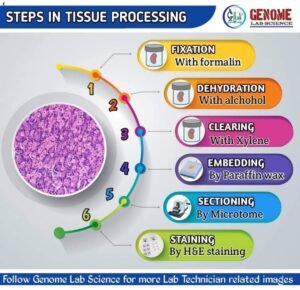
A. Fixation
This is the first and most important step. It involves treating the tissue with a chemical (called a fixative) to preserve its structure and stop decay. Fixation prevents the tissue from drying or decomposing by bacteria and enzymes. Common fixative: 10% formalin (formaldehyde solution). Purpose: To preserve the shape and structure of cells and tissues as close as possible to their natural state.
B. Dehydration
The tissue still contains water after fixation. Since wax (used later for embedding) does not mix with water, water must be removed. This is done by passing the tissue through increasing concentrations of alcohol (e.g., 70%, 90%, 100%). Purpose: To remove all water from the tissue.
C. Clearing
Alcohol is then removed using a substance that mixes with both alcohol and wax. The clearing agent also makes the tissue transparent. Common clearing agents: xylene, chloroform. Purpose: To make the tissue ready to absorb wax.
D. Embedding (Infiltration)
The cleared tissue is soaked in molten paraffin wax at about 56°C. The wax fills the spaces within the tissue, making it firm and easy to cut. The tissue is then allowed to harden in a wax block. Purpose: To provide support to the tissue for sectioning.
E. Sectioning
The wax block containing the tissue is trimmed and placed in a machine called a microtome. The microtome cuts very thin slices (sections), usually about 3–5 micrometers thick. These thin sections are carefully placed on glass slides. Purpose: To produce thin slices that light can pass through for microscopic examination.
F. Staining
Most tissues are almost colorless after sectioning. To see different structures clearly, dyes (stains) are applied. Common stains: Hematoxylin: stains cell nuclei blue or purple. Eosin: stains cytoplasm and other structures pink. Together, they are called H&E stain (Hematoxylin and Eosin) — the most common stain in histology. Purpose: To give contrast and reveal details of cells and tissues under the microscope.
G. Mounting and Labeling
After staining, the tissue section is covered with a cover slip using a clear mounting medium (like DPX). The slide is labeled with the tissue name, date, and other details. Purpose: To protect the specimen and make it permanent for future viewing.
4. Common Fixatives and Their Uses
Fixative – Use
10% Formalin – General tissue fixation
Bouin’s fluid – For delicate tissues (e.g., testes, intestine)
Glutaraldehyde – For electron microscopy
Alcohol – For cytological smears and rapid fixation
5. Common Errors in Tissue Processing
Poor fixation → leads to tissue decay or shrinkage. Incomplete dehydration → causes poor wax infiltration. Overheating → damages tissue structure. Wrong staining → makes identification difficult.
6. Safety and Care in the Histology Laboratory
Handle all chemicals (especially formalin and xylene) with gloves and masks. Avoid open flames near alcohol or xylene. Dispose of waste properly. Wash hands after handling specimens. Always label tissues correctly to avoid mix-ups.
7. Relevance of Tissue Processing to Complementary and Alternative Medicine (CAM)
Helps CAM practitioners understand tissue-level effects of herbs and natural treatments. Allows researchers to study cellular healing and regeneration caused by natural therapies. Supports diagnostic training — knowing how tissues look in health and disease.
8. Summary
Tissue processing prepares tissues for microscopic study. Main steps: Fixation → Dehydration → Clearing → Embedding → Sectioning → Staining → Mounting. The most common fixative is 10% formalin, and the common stain is Hematoxylin & Eosin (H&E). Proper technique ensures accurate and lasting results in histology.
Videos featured in this module are credited to:
Be A Lab Scientist YouTube Channel
All videos are embedded directly from YouTube and remain the property of their respective creators.